Welcome to gw_sky’s documentation!
gw_sky


Python package for making visuals of gravitational wave signals, specifically pulsar timing array signals.
Free software: MIT license
Documentation: https://gw-sky.readthedocs.io.
Features
Quickly make various gravitational waves signals and sky maps
Development Lead
Jeffrey Shafiq Hazboun <jeffrey.hazboun@gmail.com>
Installation
Stable release
To install gw_sky, run this command in your terminal:
$ pip install gw-sky
This is the preferred method to install gw_sky, as it will always install the most recent stable release.
If you don’t have pip installed, this Python installation guide can guide you through the process.
From sources
The sources for gw_sky can be downloaded from the Github repo.
You can either clone the public repository:
$ git clone git://github.com/Hazboun6/gw_sky
Or download the tarball:
$ curl -OL https://github.com/Hazboun6/gw_sky/tarball/master
Once you have a copy of the source, you can install it with:
$ python setup.py install
PTA Supermassive Black Holes Single Source to GWB
Note
This tutorial was generated from a Jupyter notebook that can be downloaded here.
Here we run through a simple example of making a gravitational wave skymap that calculates the gravitational waves strain and the time of arrival perturbation of pulsar pulses.
import matplotlib
import numpy as np
import matplotlib.pyplot as plt
import healpy as hp
%config InlineBackend.figure_format = 'retina'
from gw_sky import gwsky
pop = gwsky.smbbh_pop()
L = 20
costh = np.random.uniform(-1,1,size= L-3)
th = np.arccos(costh)
ph = np.random.uniform(0,2*np.pi,size= L-3)
th = np.append([np.pi/2,np.pi/4,np.pi/2+0.1],th)
ph = np.append([0,3*np.pi/2,np.pi-0.1],ph)
gw = []
for ii in range(L):
freq = pop['GWFreq'][ii]
h = -pop['Strain'][ii] # Strains are saved as negative values for some reason...
gw.append(gwsky.SMBBH(freq,h,th[ii],ph[ii]))
t = np.linspace(0,12.9*365.25*24*3600,200)
NSIDE = 32
NPIX = hp.nside2npix(NSIDE)
IPIX = np.arange(NPIX)
theta, phi = hp.pix2ang(nside=NSIDE,ipix=IPIX)
sky = gwsky.GWSky(gw,theta,phi)
#One can either
# str = sky.strain(t)
res = sky.residuals(t)
res.shape
(12288, 20, 200)
hp.mollview(res[:,0,0], cbar=False,title='',cmap='BuPu')
hp.graticule(verbose=False)

hp.mollview(np.sum(res[:,:,0],axis=1), cbar=False,title='',cmap='BuPu')
hp.graticule(verbose=False)

yr_in_sec = 365.25*24*3600
The following are convenience functions for plotting.
def maxmin(array):
"""Return the max an min of an array."""
return array.max(), array.min()
def gw_sum(array, n='all'):
'''
Convenience function to return either a single source,
sum of a list of sources indicated by index or all summed sources.
'''
if n=='all':
return np.sum(array,axis=1)
elif isinstance(n,list):
return np.sum(array[:,n,:],axis=1)
elif isinstance(n,int):
return array[:,n,:]
The following method plots individual GW sources and sums of GW sources frame by frame for use in animations.
def plot_gw(residuals,
psrs=[0,1,[0,1],'all'],
Nt=1,
action='show',
name='./gwb_resids/gwb_full'):
ii = 0
for p in psrs:
res = gw_sum(residuals,n=p)
Max, Min = maxmin(res)
idx1 = 9000
idx2 = 6500
idx3 = 2500
ang1=hp.pix2ang(NSIDE,idx1)
ang2=hp.pix2ang(NSIDE,idx2)
ang3=hp.pix2ang(NSIDE,idx3)
if p=='all':
space = 0.01*2*(res[idx1,:].max()+res[idx2,:].max()+res[idx3,:].max())
else:
space = 0.1*2*(res[idx1,:].max()+res[idx2,:].max()+res[idx3,:].max())
shifts = [np.abs(res[idx1,:].min())+ res[idx2,:].max() + space,
0,
res[idx2,:].min() - res[idx3,:].max() - space]
for n in range(Nt):
fig, (ax1, ax2) = plt.subplots(2, 1, figsize=[9,9],
gridspec_kw={'height_ratios': [2, 1]})
# Plot the sky map
plt.sca(ax1)
hp.mollview(res[:,n], cbar=False,title='',cmap='BuPu',min=Min,max=Max, hold=True)
hp.graticule(verbose=False)
# Plot the stars on the sky map
hp.projscatter(ang1[0],ang1[1],s=22**2,marker='*',color='C0',edgecolors='k',zorder=3)
hp.projscatter(ang2[0],ang2[1],s=22**2,marker='*',color='C1',edgecolors='k',zorder=3)
hp.projscatter(ang3[0],ang3[1],s=22**2,marker='*',color='C3',edgecolors='k',zorder=3)
# Plot the traces on the traceplot. Shift by the amount calculated above.
ax2.plot(t/yr_in_sec,res[idx1,:]+shifts[0],color='C0', lw=2)
ax2.plot(t/yr_in_sec,res[idx2,:]+shifts[1],color='C1', lw=2)
ax2.plot(t/yr_in_sec,res[idx3,:]+shifts[2],color='C3', lw=2)
# Plot the stars on the trace plot
ax2.scatter(0,res[idx1,0]+shifts[0],s=22**2,marker='*',color='C0',edgecolors='k',zorder=3)
ax2.scatter(0,res[idx2,0]+shifts[1],s=22**2,marker='*',color='C1',edgecolors='k',zorder=3)
ax2.scatter(0,res[idx3,0]+shifts[2],s=22**2,marker='*',color='C3',edgecolors='k',zorder=3)
# Plot the verticle line that shows the current time.
ax2.axvline(t[n]/yr_in_sec, linewidth=0.7,color='k')
ax2.set_yticks([])
ax2.set_xlabel('Years',fontsize=12)
ax2.set_ylabel(r'Gravitational Wave Strain',fontsize=12)
# ax2.set_ylabel(r'Change in Arrival Time',fontsize=12)
if isinstance(p,int):
N = 1
elif isinstance(p,list):
N = len(p)
elif p=='all':
N = L
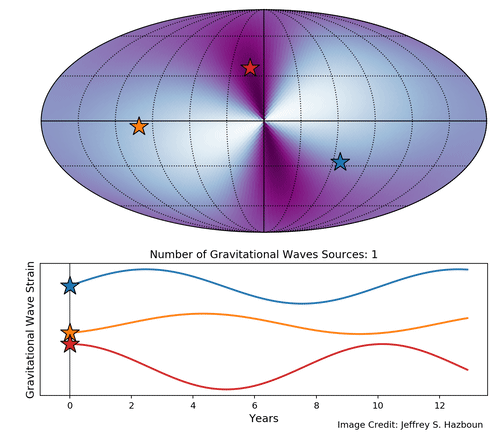
ax2.set_title('Number of Gravitational Waves Sources: {0}'.format(N))
fig.text(x=0.64,y=0.12,s='Image Credit: Jeffrey S. Hazboun')
box = ax2.get_position()
box.y0 = box.y0 + 0.051
box.y1 = box.y1 + 0.051
ax2.set_position(box)
if action=='save':
plt.savefig('{0}_{1}.png'.format(name,ii), dpi=171, bbox_inches='tight')
elif action=='show':
plt.show()
ii+=1
plt.close()
The above script will iterate through the sky maps to make as many
animations as you would like. Use a list of either integers, list of
integers or the string 'all'. An individual index will return a
single source, a list of indices will add togethers those sources and
'all' will sum all the sources. Nt is the number of frames in
the animation and will error if you exced the number of time steps in
the array.
Below we use the action='show' kwarg to show the plots.
plot_gw(res, psrs=[0,1,[0,1],2,[0,1,2],'all'], Nt=1, action='show')#


Executing the following cell would with the action='show' kwarg will
save the plots to the 'PLOT_DIR' directory with file names
'gwb_full_0.pdf' and so forth.
# plot_gw(res,psrs=[0,1,[0,1],2,[0,1,2],'all'], Nt=200, action='save', name='./PLOT_DIR/gwb_full')#
Making Animations
The following cells require the package ffmpeg which can be
installed via conda or your favorite package manager for c code.
The next cell makes an mp4 movie out of the frames saved above.
#! ffmpeg -r 18 -f image2 -s 1920x1080 -i one_source_%d.png -vcodec libx264 -crf 15 -pix_fmt yuv420p one_source.mp4
The following two cells make a gif from the frames saved above.
The next cell makes a color palette for use in a complex filter. This makes the gif much cleaner looking.
#! ffmpeg -i gwb_full_%d.png -vf palettegen palette.png
The next cell uses the pallete file made above and the frames to make a
animated gif.
#! ffmpeg -y -i gwb_full_%d.png -i palette.png -filter_complex "fps=45,scale=1032:-1:flags=lanczos[x];[x][1:v]paletteuse" gwb_full.gif
Detailed User Interface Information
GWSky
Main module.
-
class
gw_sky.gwsky.GWSky(sources, theta, phi, pol='gr')[source]¶ Class to make sky maps for deterministic PTA gravitational wave signals. Calculated in terms of \(\hat{n}=-\hat{k}\).
- Parameters
- sourceslist
List of skymap.GW objects that contain the various gravitational wave sources for analysis.
- thetalist, array
Pulsar sky location colatitude at which to calculate sky map.
- philist, array
Pulsar sky location longitude at which to calculate sky map.
- pol: str, optional [‘gr’,’scalar-trans’,’scalar-long’,’vector-long’]
Polarization of gravitational waves to be used in pulsar antenna patterns. Only one can be used at a time.
Contributing
Contributions are welcome, and they are greatly appreciated! Every little bit helps, and credit will always be given.
You can contribute in many ways:
Types of Contributions
Report Bugs
Report bugs at https://github.com/Hazboun6/gw_sky/issues.
If you are reporting a bug, please include:
Your operating system name and version.
Any details about your local setup that might be helpful in troubleshooting.
Detailed steps to reproduce the bug.
Fix Bugs
Look through the GitHub issues for bugs. Anything tagged with “bug” and “help wanted” is open to whoever wants to implement it.
Implement Features
Look through the GitHub issues for features. Anything tagged with “enhancement” and “help wanted” is open to whoever wants to implement it.
Write Documentation
gw_sky could always use more documentation, whether as part of the official gw_sky docs, in docstrings, or even on the web in blog posts, articles, and such.
Submit Feedback
The best way to send feedback is to file an issue at https://github.com/Hazboun6/gw_sky/issues.
If you are proposing a feature:
Explain in detail how it would work.
Keep the scope as narrow as possible, to make it easier to implement.
Remember that this is a volunteer-driven project, and that contributions are welcome :)
Get Started!
Ready to contribute? Here’s how to set up gw_sky for local development.
Fork the gw_sky repo on GitHub.
Clone your fork locally:
$ git clone git@github.com:your_name_here/gw_sky.git
Install your local copy into a virtualenv. Assuming you have virtualenvwrapper installed, this is how you set up your fork for local development:
$ mkvirtualenv gw_sky $ cd gw_sky/ $ python setup.py developCreate a branch for local development:
$ git checkout -b name-of-your-bugfix-or-feature
Now you can make your changes locally.
When you’re done making changes, check that your changes pass flake8 and the tests, including testing other Python versions with tox:
$ flake8 gw_sky tests $ python setup.py test or py.test $ toxTo get flake8 and tox, just pip install them into your virtualenv.
Commit your changes and push your branch to GitHub:
$ git add . $ git commit -m "Your detailed description of your changes." $ git push origin name-of-your-bugfix-or-featureSubmit a pull request through the GitHub website.
Pull Request Guidelines
Before you submit a pull request, check that it meets these guidelines:
The pull request should include tests.
If the pull request adds functionality, the docs should be updated. Put your new functionality into a function with a docstring, and add the feature to the list in README.rst.
The pull request should work for Python 2.7, 3.4, 3.5 and 3.6, and for PyPy. Check https://travis-ci.org/Hazboun6/gw_sky/pull_requests and make sure that the tests pass for all supported Python versions.
Deploying
A reminder for the maintainers on how to deploy. Make sure all your changes are committed (including an entry in HISTORY.rst). Then run:
$ bumpversion patch # possible: major / minor / patch
$ git push
$ git push --tags
Travis will then deploy to PyPI if tests pass.
Credits
Development Lead
Jeffrey Shafiq Hazboun <jeffrey.hazboun@gmail.com>
Contributors
None yet. Why not be the first?